 ), points (
 ), regions (
 ), or text.
 Map layers display objects that are either lines (), points (), regions (), or text.
Change the way point, line, polygon, and text spatial objects are displayed on the map including line styles, point styles, fill styles, text fonts, and symbology. Some map layers contain different types of display objects within the same layer. Following are the object types that compose each layer. So, for example, the Fields map layer has both Line and Fill properties that can be set.
| Points | Lines | Fills |
|---|---|---|
| Cross Sections | ||
| Culture | ||
| Facilities | ||
| Fields | Fields | |
| Grids | ||
| Incidents | ||
| Land | Land | |
| Pipelines | ||
| Pools | Pools | |
| Seismic | Seismic | Seismic |
| Units | Units | |
| Well Holding and Spacing | Well Holding and Spacing | |
| Wells |
For some layers, different draw styles or rendering methods can be selected. For example, pipelines can include draw styles such as Basic, where pipelines are represented by basic lines, or By Status where the line style differs depending on whether the pipeline is abandoned, operating, to be constructed, etc.
The Layer Properties pane appears immediately below the Layer Legend pane. The Layer Properties pane displays the options available for a given layer selected in the Layer Legend pane. The Visible Scale Range, which specifies the minimum and maximum map scale at which a given layer appears, can be set for each individual layer.
Layer settings are remembered for future AccuMap sessions. .png)
The following procedure describes how to set display properties for fills, points, lines, and text.
The name of layers for which you aren't licensed are preceded by  in the Layer Legend.
 ) and whether road allowances are displayed.
 , and then drag the slider as depicted.
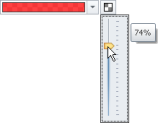
To save configuration properties as the default settings for future maps, using the Ribbon toolbar, with the View tab displayed, click Save as Default ( ).
).
, and then drag the slider as depicted.  , and a horizontal well as follows:
  . In these cases the D and the H indicate the location of the surface well and the well symbol (
 ) indicates the bottom hole location. Select the point size for the symbol from the drop-down list, the wellbore thickness, and click Color Map to display the Setup Directional Survey Formation Color Map dialog box where you associate colors with a formation. Click Well Symbol Legend for a legend of well symbols.
 To save configuration properties as the default settings for future maps, using the Ribbon toolbar, with the View tab displayed, click Save as Default ().
, and then drag the slider as depicted. To save configuration properties as the default settings for future maps, using the Ribbon toolbar, with the View tab displayed, click Save as Default ().
, and then drag the slider as depicted. To save configuration properties as the default settings for future maps, using the Ribbon toolbar, with the View tab displayed, click Save as Default ().
The data that's displayed for a layer is based on the detail that's available for the layer in one of several culture files. Generally, culture files that are drawn from at a higher map scale (1:2,500,000) include less detail than those drawn from at a lower map scale (1:1,000,000). AccuMap switches to a culture file with more detail as your map scale is reduced.
Although you can set the scale range at which objects for a map layer are displayed, in order for those items to appear, they must exist in the culture file that AccuMap is accessing, using the Visible Scale Range option in the Layer Properties pane below the Layer Legend, you can't override the culture file that AccuMap uses at a given map scale. For example, if the culture file AccuMap uses at a map scale of 1:1,000,000 includes the Cities outline and the culture file that's invoked at a map scale of 1:2,500,000 doesn't, the Cities layer won't be visible when the map is zoomed to 1:1,000,001 or greater -even if the Visible Scale Range option for the Cities layer is changed to 1:1,000,001 or greater.
To save configuration properties as the default settings for future maps, using the Ribbon toolbar, with the View tab displayed, click Save as Default ().